Getting started with Taxi Butler
Use this guide to learn how to get started with your new Taxi Butler devices and how to start accepting bookings (and payments) with them.
Before you get started, make sure that:
- You have a PORTAL account
- Your devices are charged and powered-on
- You have access to your dispatch system’s portal
Log in to your account
Go to the Taxi Butler PORTAL and log into your account.
Don’t have an account or having problems logging in? Contact us.
Configure your default settings
You can configure default settings for new venues in the PORTAL. Every time you create a new venue, the default settings will be loaded. Existing venues will remain untouched and can still be updated manually. If you already have a lot in the PORTAL, you can still configure the default settings and apply them to existing venues.
- Head to the ‘Company Settings’ tab.
- Click on "Edit" located at the top and bottom of the page.
- Under the “Default Taxi Butler Settings” section, you can configure default settings for your Taxi Butlers, which will be applied to all new venues by default.
To import default settings on an existing venues, simply go to the desired venue, press "Edit" then scroll down and press on "Import default values".
Link device to a new or existing venue
Linking the device to a new venue
- Click on “add venue” from the Dashboard page or from within the "Venues" tab.
- Fill out the location details like address, name, country, and timezone.
- Next, scroll down to "Taxi Butle PLUS options" and configure the device for this location by referring to the next step.
- Finally, you can press “save” to finalise the configuration for this venue.
- The PORTAL will now prompt you to add a device to this venue.
- The first time you power on the device, it will show an activation code on-screen.
- Type the activation code into the prompt in the PORTAL.
Linking the device to an existing venue
- Go to the “Venues” tab and select the venue you want to add the device to
- Click on the “Taxi Butler(s) at venue” tab.
- Next, click on the "Add Butler to venue" button.
- The PORTAL will now prompt you to add a device to this venue.
- The first time you power on the device, it will show an activation code on-screen.
- Type the activation code into the prompt in the PORTAL.
Configure your device
As mentioned in the previous section, the Taxi Butler PLUS settings can be configured at a company level, meaning that the default settings will be loaded for every new venue, or directly at a venue level.
The following options can be set either on the 'Company settings' page (to use as default), on an existing venue, or when adding a new venue. When adding a new venue, you should fill out all the venue details like address, name, etc. as usual.
Option settings
Each option has a “visible” and a “required” checkbox. If an option is set to “visible”, this means that it will be visible in the device interface when someone is placing a booking. The opposite is true when it is not set to “visible”. The “required” checkbox makes the field mandatory when someone is placing a booking. The opposite is also true when it is not set to “required”.
Available options
| Description | Configuration | |
| Taxi types | Add or remove unlimited taxi types from the PLUS interface. | You can choose which taxi type is selected by default, choose an icon, write a label and description and configure the number of passengers and luggage. You can also configure this option for your dispatch system. |
| Payment types | Add or remove payment types from the PLUS interface. The option for on-device payments with Taxi Butler PAY is set separately. | You can choose an icon, write a label and description, and configure this option for your dispatch system. |
| Future bookings | Set how soon or how late prebookings can be made. | Choose how soon or how far in advance someone can prebook your taxis. Choose a time from now in days, hours and minutes. |
| Destinations | Enable destination entry and add preset destinations. | Add up to 7 preset destinations that will show at the top of the destinations list in the interface. |
| Passenger name and phone | Choose to collect passenger name and/ or telephone number. | No configurations possible. |
Device overview
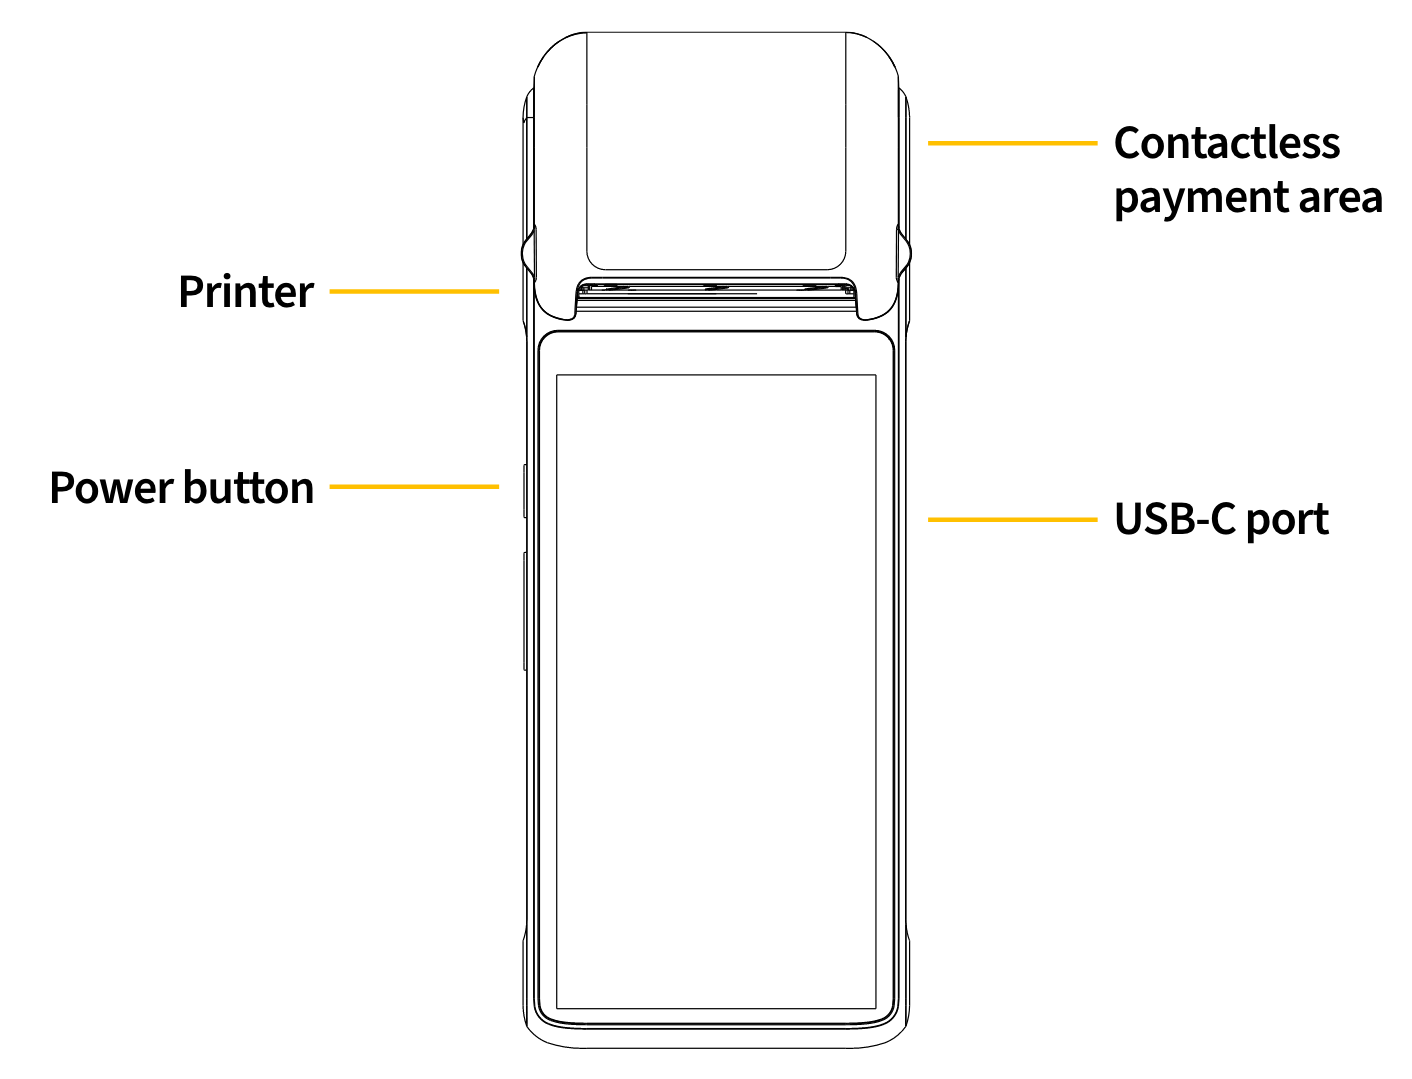
Hardware overview
Powering on and off
To power on: Press and hold the power button for 2-3 seconds when the device is off.
To power off: Press and hold the power button for 2-3 seconds when the device is on.
Unlocking the screen
In some cases, the device's screen may lock itself. To unlock it, simply enter the code "1234" when prompted to do so.
Changing the printer thermal paper roll
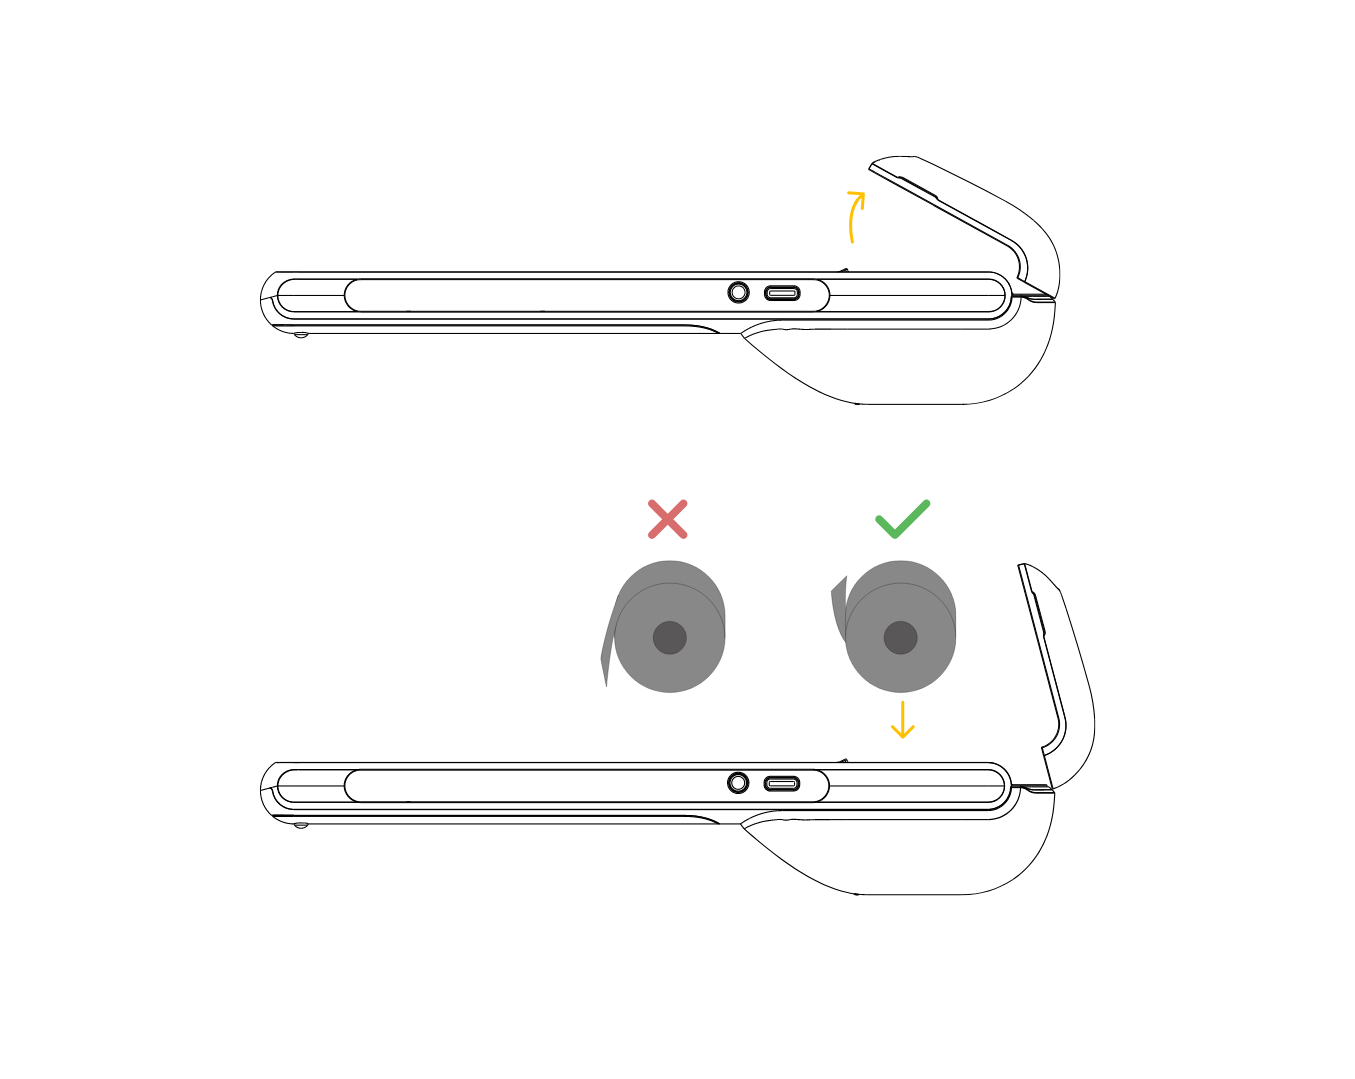
- Lift up the printer cover using the edges on the sides of the device
- Remove the old roll if necessary. Put a new thermal paper roll (58mm width, ⌀40mm / 2 1/4" x 1 5/8") in place and pull some paper outside the cutting area
- Close the printer cover and remove any excess paper
Interface overview
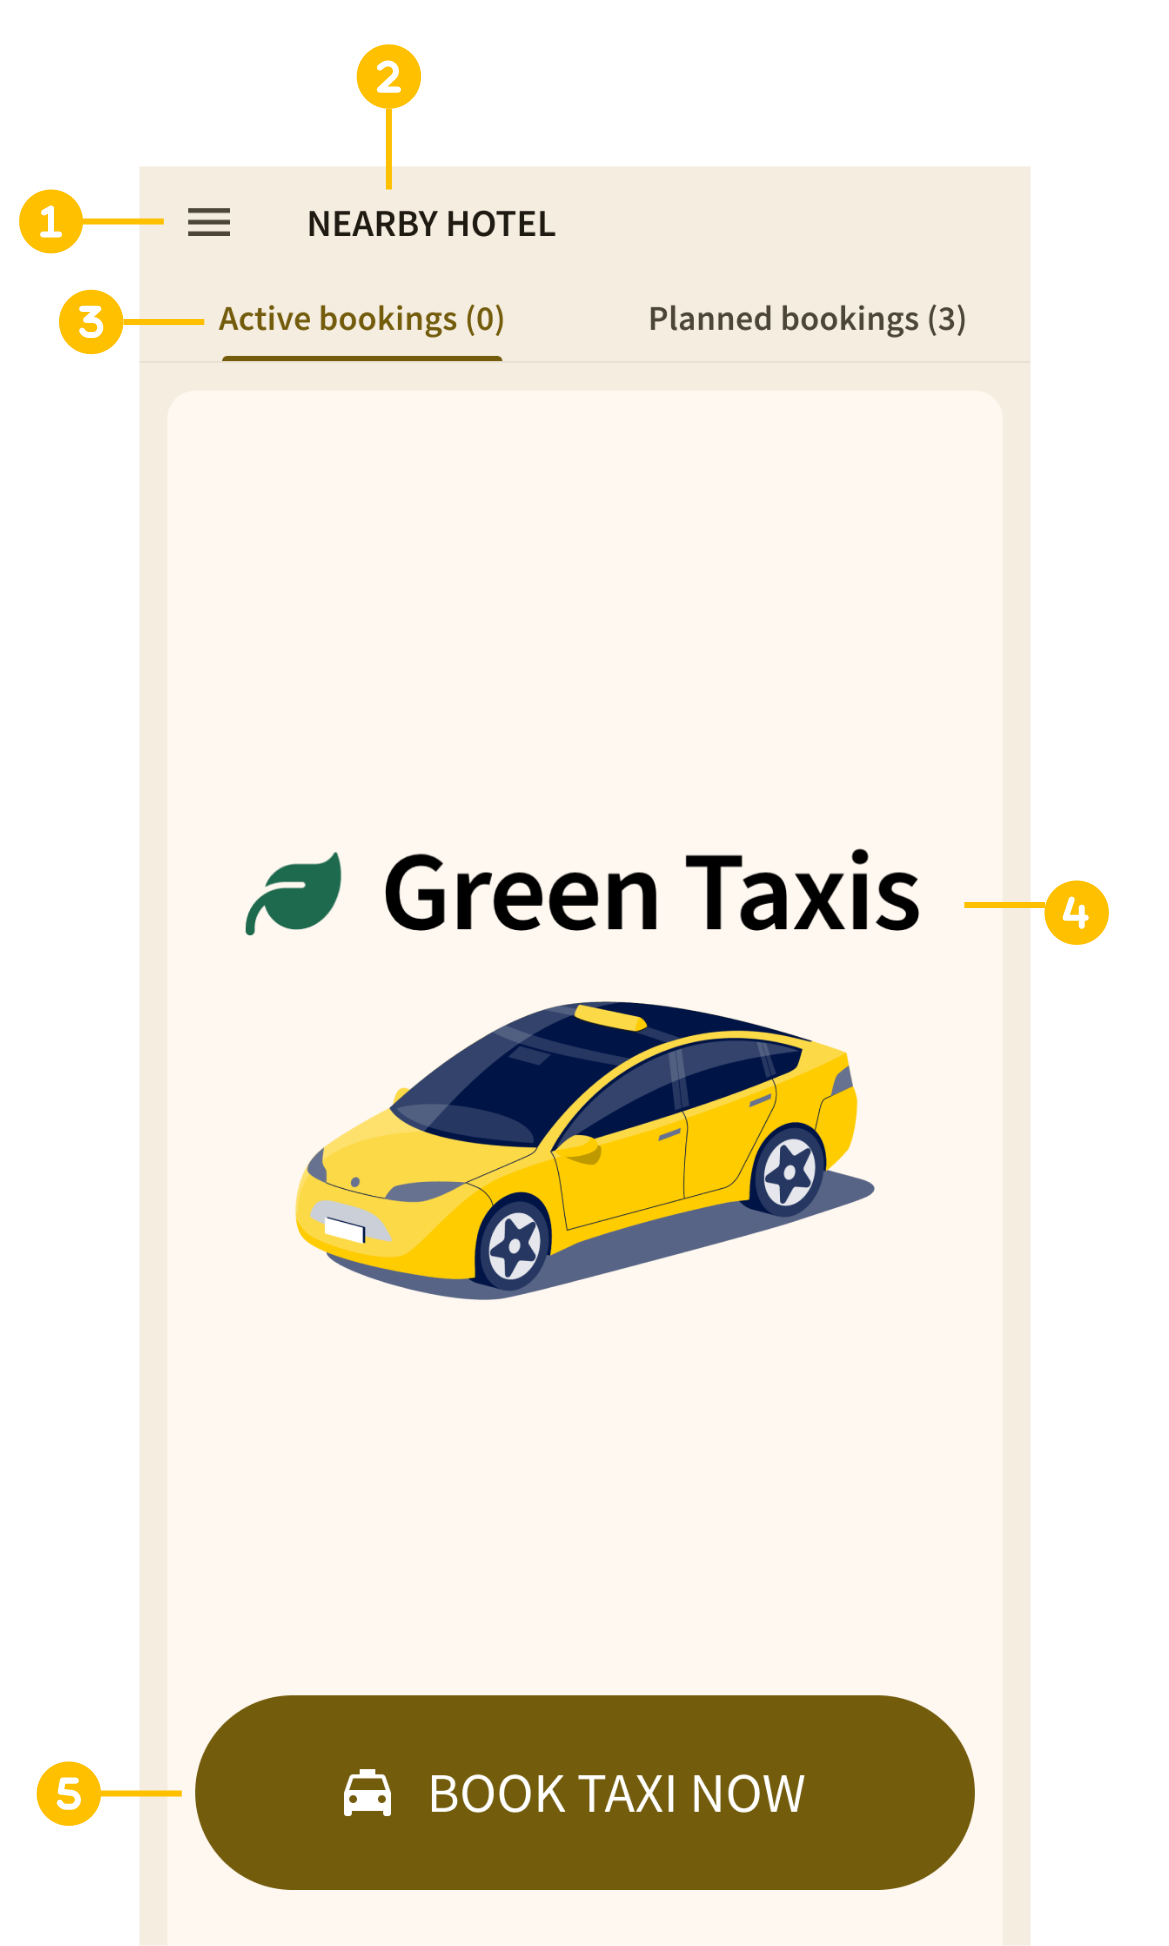
- Menu button: Access connection info, legal terms, and device settings
- Venue/location name: The location to which the device is linked
- Booking tabs: Switch between active bookings and prebookings (Planned)
- Company logo: Your company logo
- Book button: Start the booking process
Connecting to Wi-Fi
To connect the device to a Wi-Fi network, simply press on the Menu Button, then press on Connect to Wi-Fi at the bottom of the menu. You can select a network and enter the correct password to connect.
Changing interface language
To change the interface language, simply press on the Menu Button, then press on Language at the bottom of the menu. You can select a language from the list.
Reloading device configuration
The device automatically checks for any changes made in the PORTAL every 60 minutes and will update accordingly. If you want to force reload the configuration to apply any changes made in the PORTAL, simply press on the Menu Button on the device, press on Device Information, then Reload Configuration.
How to book a taxi
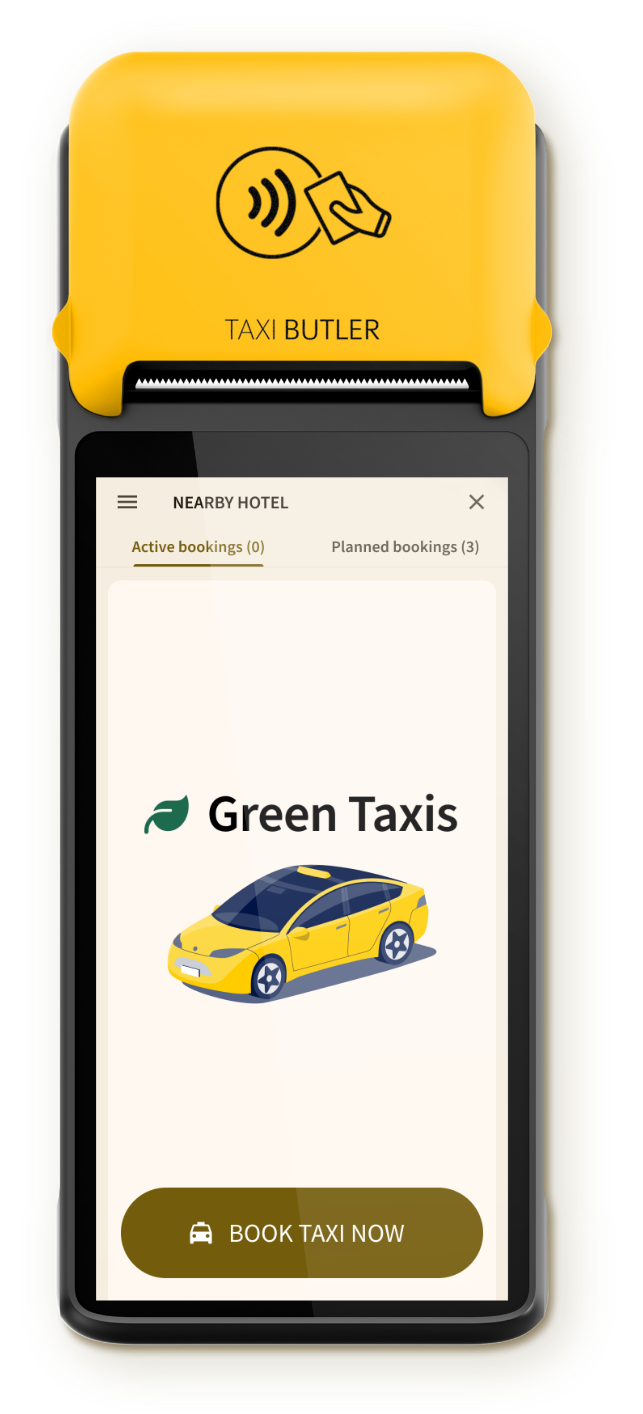
To start a booking, property staff need to press the on-screen “Book taxi now” button.
- Property staff can be anyone who works inside a hotel, bar, restaurant or any other public business in which the device is placed and used to book taxis on behalf of guests.
Property staff should use the touchscreen to enter all the required and/or optional guest details.
They will need to:
- Enter any required and/or optional fields (like destination, vehicle type, date & time, etc.)
- Enter a correct guest name and phone number
- A guest's actual phone number must be provided, otherwise they will not receive the text message with a link to track, manage and cancel the booking and a link to the terms & conditions.
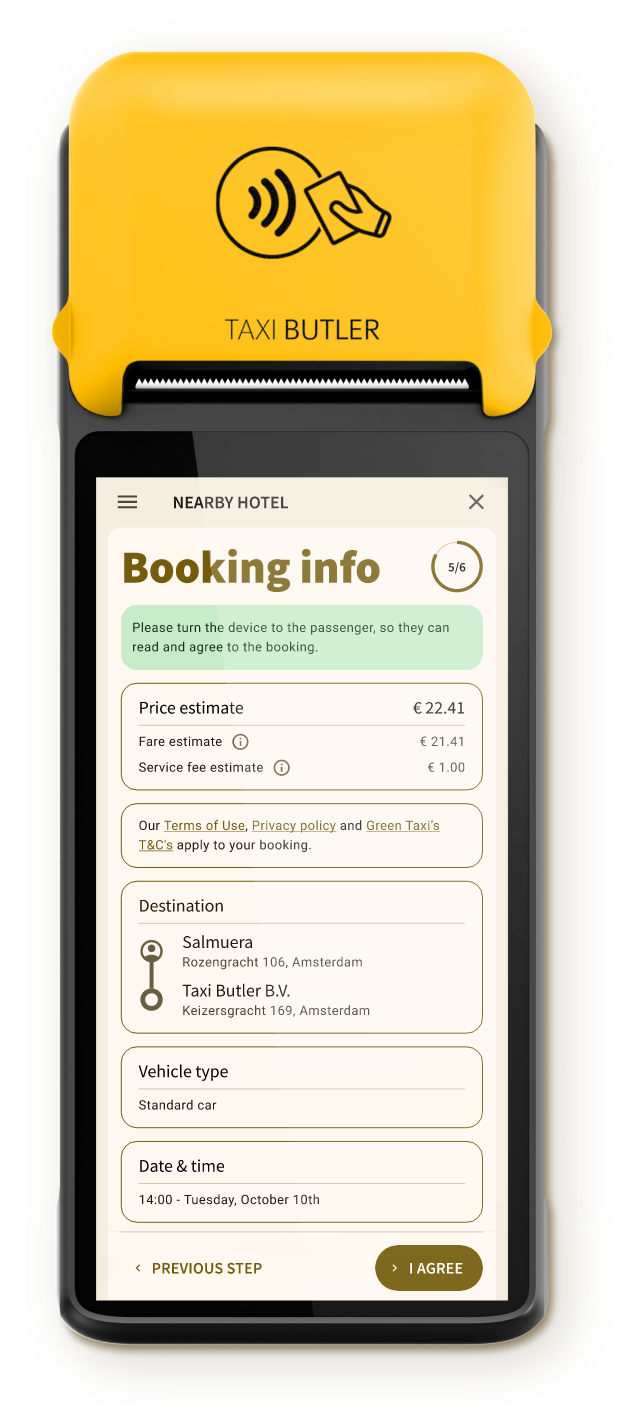
Property staff should now turn the device to face the guest. This allows them to read the booking details, price estimate and terms & conditions.
The guest should press on the "I AGREE" button when they agree with the booking.
- Only the guest must press on the "I AGREE" button.
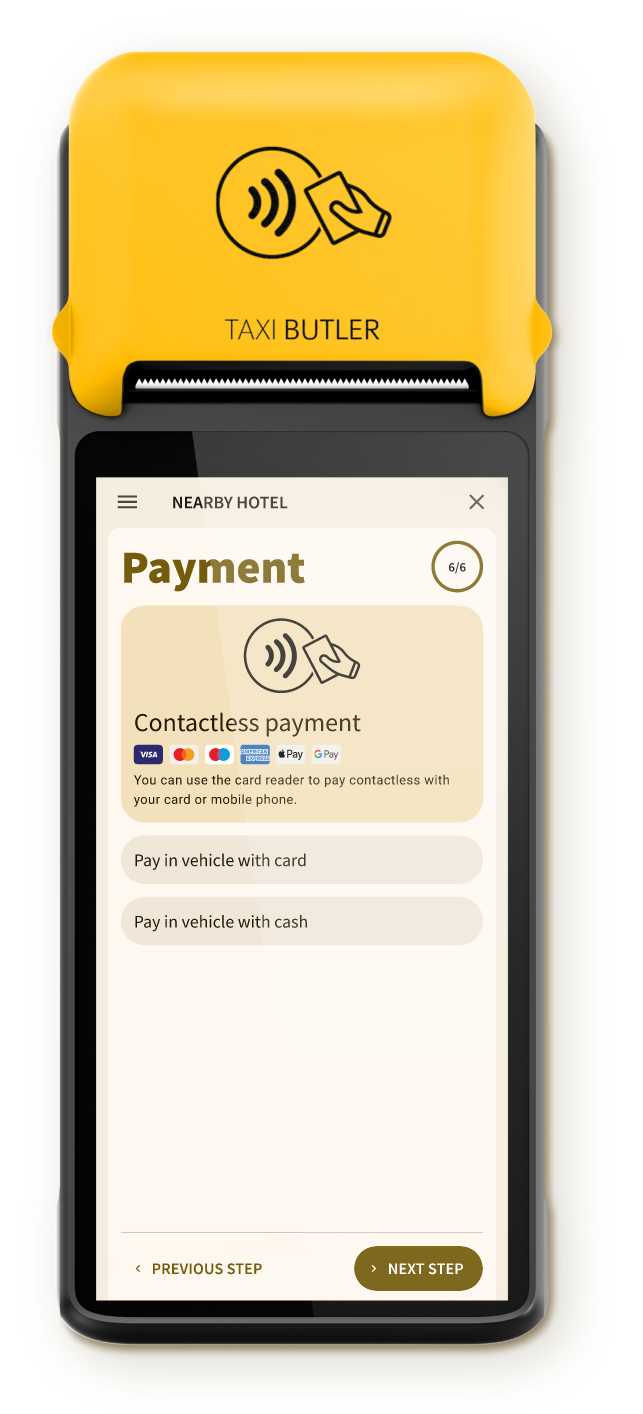
In some cases, guests may have to choose a payment option to continue with the booking.
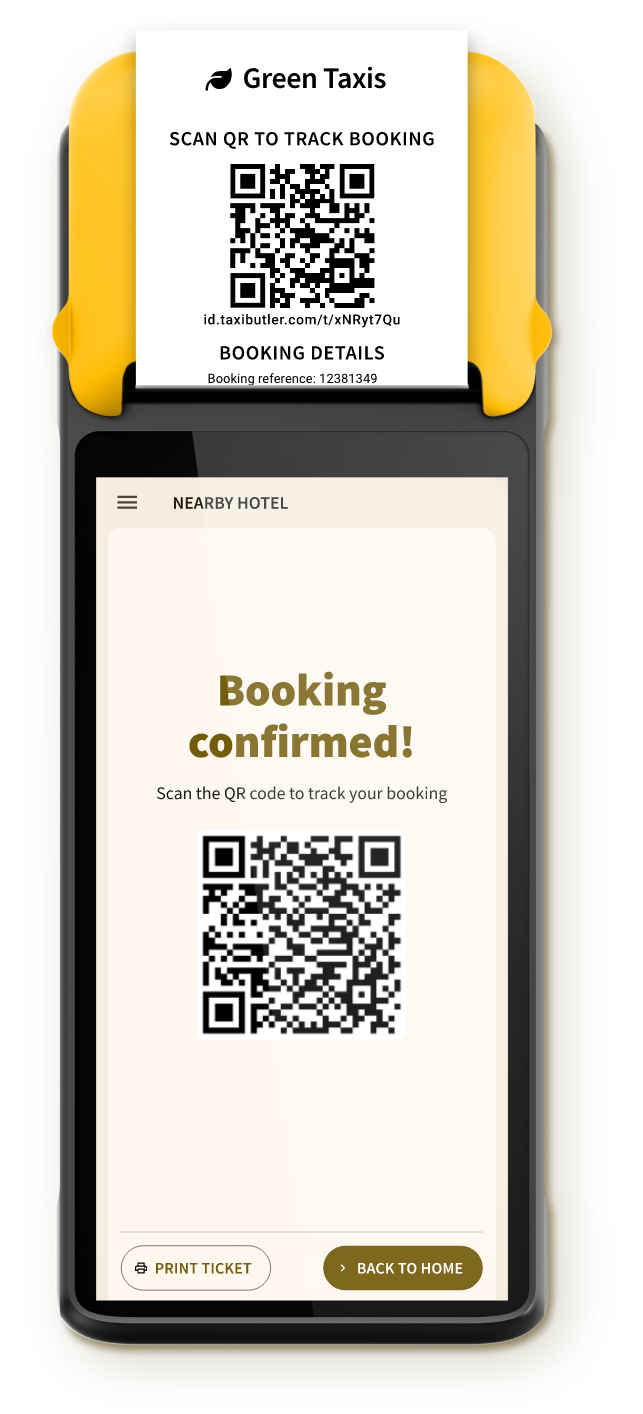
The guest's booking is now confirmed! Property staff must now hand the printed ticket to the guest. It contains a booking reference and other details.
By scanning the QR code on the ticket, the guest will be taken to a mobile booking track where they can track, manage and cancel their taxi, find application terms & conditions and contact the transportation provider. In some cases, the guest will also receive a text message with a link to this mobile booking tracker.
How to track a taxi
To track taxis, guests can scan the QR code on the printed ticket that takes them to a mobile tracking page on their mobile phone. From this page, guests can track, manage and cancel their taxi, find application terms & conditions and contact the transportation provider
The taxi tracking QR code will also appear at the end of the booking process.
How to manage bookings
To navigate to a booking, first use the Booking Tabs to switch between Active and Planned bookings.
Active bookings can have different statuses like: "Driving to pickup", "Arrived at pickup" and "Cancelled". Planned bookings remain "Planned" until the trip is dispatched.
To manage a booking, simply press on an Active or Planned booking. From here, you can track the taxi on the map, print a ticket again, or cancel the booking.
Learn more about how Taxi Butler PAY works and how to onboard here.